Emergency
 Residential Restoration
 Commercial
 Water Removal
 Water Damage
 Water Damage Repairs
 Flood
Flood Sewage Cleanup
 Fire Board
 Fire Damage
 Commercial Water Damage
 Commercial Fire Damage
 Mold Inspection
 Mold Removal
 Wind
Wind TOMI
TOMI Case
Case Helpful
 ERP Client
 Construction
 Kitchen
 Bathroom
 Home
Home Office
 Book Remodel
 About
About Contact Us
 Our Story
 Events
 Media
Media FAQ
FAQ Apply Now
 Careers
 Plumber Referral
 All Posts
 Cleaning
 Commercial
 Schools & Colleges
 Churches
 Healthcare Facilities
 Senior Living Homes
 Government Municipalities
 Hospitality
 Industrial
 Multi-Family Housing
Emergency Board Up Services
If your home or business incurs storm or fire damage resulting in an opening in your building you may be in need of emergency board-up services. Any openings in the structure need’s to be properly boarded up to protect the building from the weather and illegal entry. Your insurance policy also requires you to be proactive in protecting your home or business after any type of damage has occurred, otherwise, the insurance company could account for any further/secondary damage to the structure as negligence.
Not every situation requires the most extensive board up that the U.S. Fire Administration have in their board up procedure manual, such as after a fire where the entire home is destroyed and is considered a complete loss. While each emergency board up services is different, let’s take a look at how to properly board up a structure after the damage has caused an opening in the building.
Determining How Much Protection Is Needed
- Openings in the basement, first floor doors, windows, and any point of entry accessible from a porch, fire escape, or other potential climbing points require additional security measures. These openings should be barricaded with plywood, 2x4s, bolts, and nails.
- Openings that are at least 10′ from ground level which are not accessible from a porch, fire escape, roof, or another climbing point can be secured with nails in each brace, and every 12″ around the perimeter. For these openings the plywood should be fitted so that it rests snugly against the exterior frame, butting up to the siding on wood frame buildings and up to the brickwork on brick buildings. It may be necessary to remove the staff bead so this fit can be flush and tight.
Boarding Up
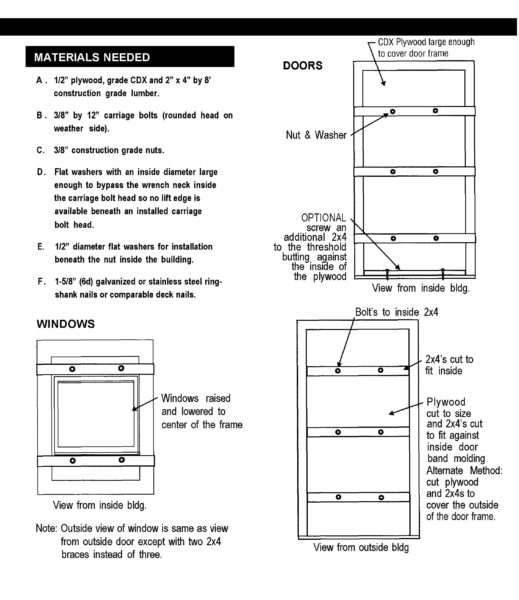
- Cut plywood to fit over the window and door openings, flush with the outside of the molding. Note: For buildings with a metal door and window frames the alternative is to cut the plywood and 2x4s to fit the inside of the door frame buffed up against the band molding.
- Cut the 2x4s to fit the horizontal dimension of the plywood. You will need two 2×4 exterior and two interior braces for each window and three sets for each door. Note: For buildings with metal doors and window frames the 2x4s for the outside will be cut to the dimensions of the plywood, fitting inside the door frame, against the band molding. For the inside, the 2x4s will be cut to the outside dimension of the door or window frame.
- Pre-drill 3/8th inch holes in the plywood and the braces.
- The holes will be placed approximately 1/3 of the length of the brace from each outside edge of the door and window jam.
- The two window braces will be placed 1/3 of the distance from the top and the bottom of the window.
- The three-door braces will be placed; one in the center of the doorway, and one half the distance from the center to the top and to the bottom of the doorway.
- Place the plywood over the exterior opening and nail to the frame. Note: For metal frames place the plywood and braces inside the frame against the band molding.
- Place the 2×4 braces over the interior and exterior of the door or window.
- Place the large washer over the carriage bolt and place the bolt through the holes.
- Place washer and nut inside and tighten securely. Torque the nut so that it slightly compresses the interior 2×4.